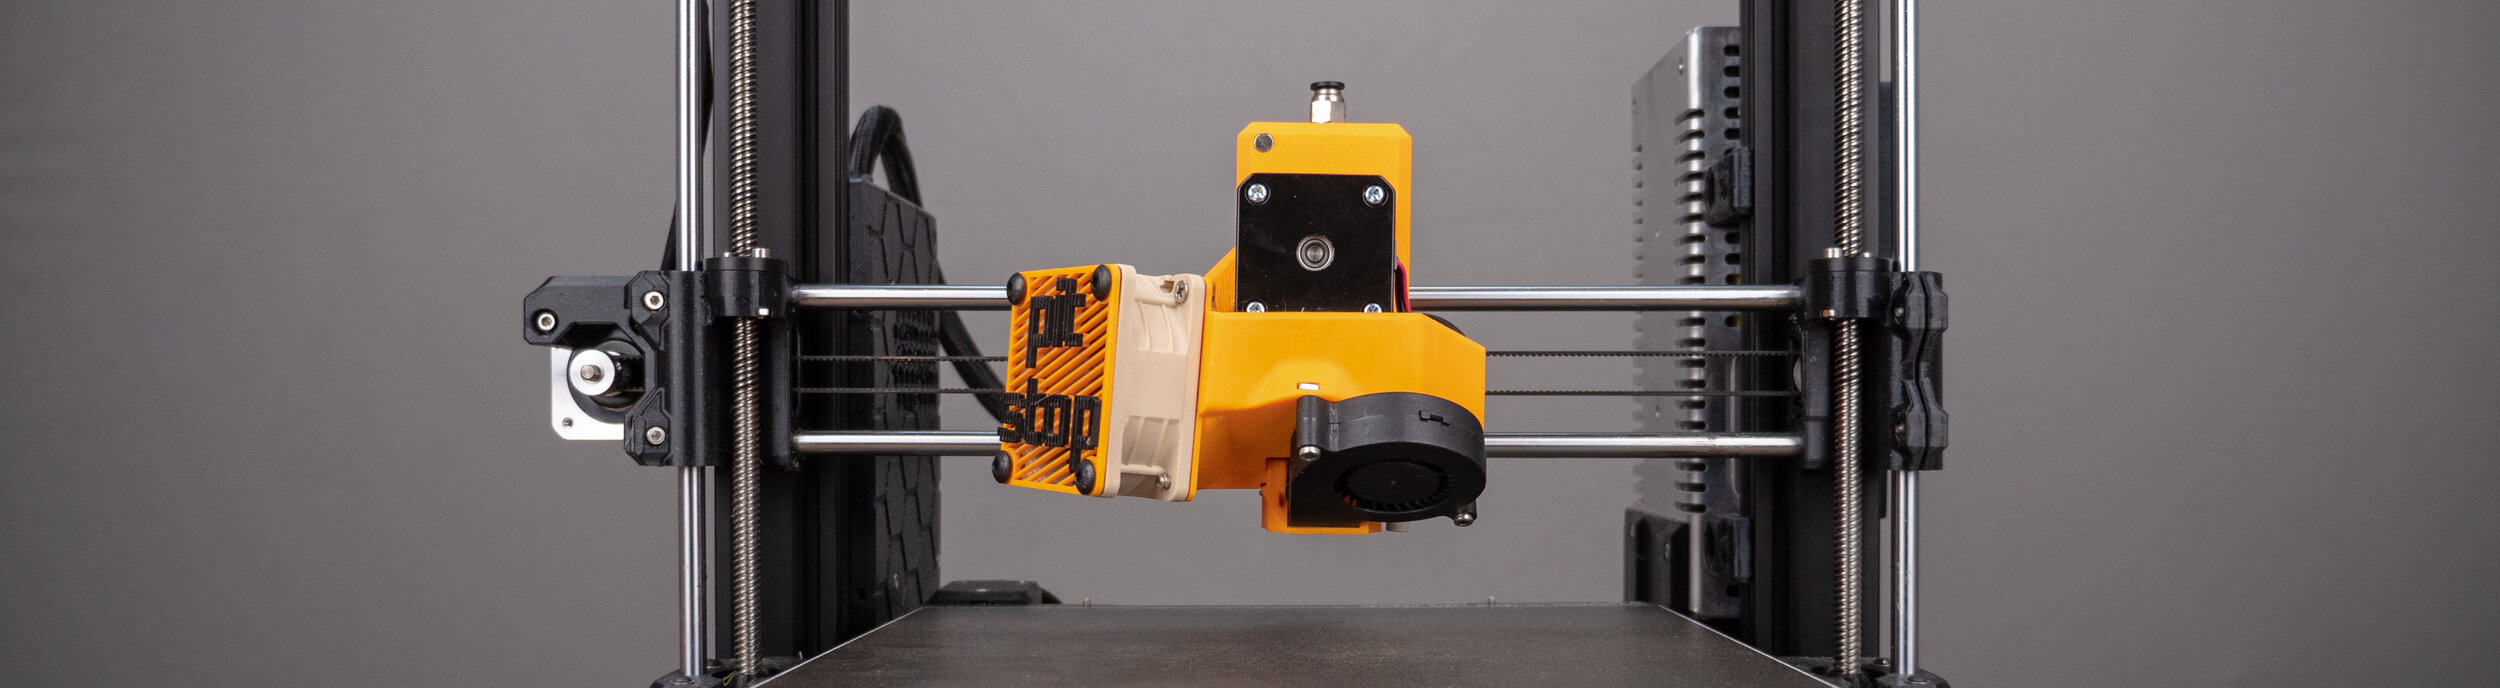
PitStop Extruder
PitStop Bill of Materials 🛠️
Bill of materials video:
Foreword
Warning: This extruder has seen very limited testing. There is a risk that something will malfunction. If in doubt, I advise waiting for more people to test it and provide feedback before you proceed. This way I'll have time to make further tweaks and build a knowledge base.
Optional parts
If it’s your first time modifying the printer, I suggest staying away from the optional mechanical parts. The IGUS bearings and X-axis replacement are more sensitive to build and print errors and can lead to calibration issues or other not fun problems which you will have to troubleshoot on your own (especially for IGUS bearings, which can lead to calibration errors and the "602" horizontal inconsistency). Update: I advise against using IGUS bearings and instead using high quality ball bearings such as Misumi (which come with new MK3S+ printers). There are many problems that can occur not related to the extruder, but because the axes need to be disassembled and put back together.
Friendly note on modding
Going down the rabbit hole of modding can lead to a barren land devoid of resources where you’re pretty much on your own fixing a cascade of problems you never knew could happen. If the printer works for you, I urge you to enjoy printing without changing anything. And when it doesn’t work, there could be an easy fix out there. Having said that, if you still want to proceed, I admire your bold determination.
Disclaimer
Let me first start with the obvious and remind you that the PitStop design is offered as is. I take no responsibility for what you do with it. It can run better, but could also run worse. There are no guarantees. All material is for informational purposes only. By using any information or resources provided you agree that you will use these in a safe and legal manner, consistent with all applicable laws, safety rules, and good common sense. You further agree that you will take the necessary steps to keep any information or hardware out of the hands of minors and untrained and/or immature individuals.
Compatibility
✅ Prusa MK3S printer
✅ Prusa MK2.5S printer (limited testing)
✅ Stock frame (not tested)
✅ Bear frame (except for X-Axis)
✅ MMU2S (optional)
✅ Adapted Revised X-Axis (optional)
✅ Stock bearings
✅ Igus bearings (optional)
✅ stock E3D V6 extruder
✅ Dragon extruder (limited testing)
❌ Bear X-Axis
❌ Revised X-Axis
❌ Other extruders (such as the Mosquito)
Bill of Materials
As this project was created a long time ago, the old links to products don't work anymore and I have removed them. Sadly, I don't have time to add new ones.
Printer
- Prusa i3 MK3/MK3S printer or Prusa i3 MK3 + MK3S upgrade kit (extruder printed parts not needed). Or get only the IR sensor. Magnets are still required when using the MMU2S
- Prusa i3 MK3S+ printer may work. I have not tested it. It seems that the PTFE tube in the extruder might be 2mm shorter and will require replacement in this case.
- Prusa MMU2S upgrade (optional) if you have MMU2 or MMU1. Note that the MMU2S upgrade might include the MK3S upgrade. However, this MK3->MK3S included upgrade does NOT come with the requried magnets, so you'll need to find extra magnets (covered under the required hardware section). MMU2S upgrade kit
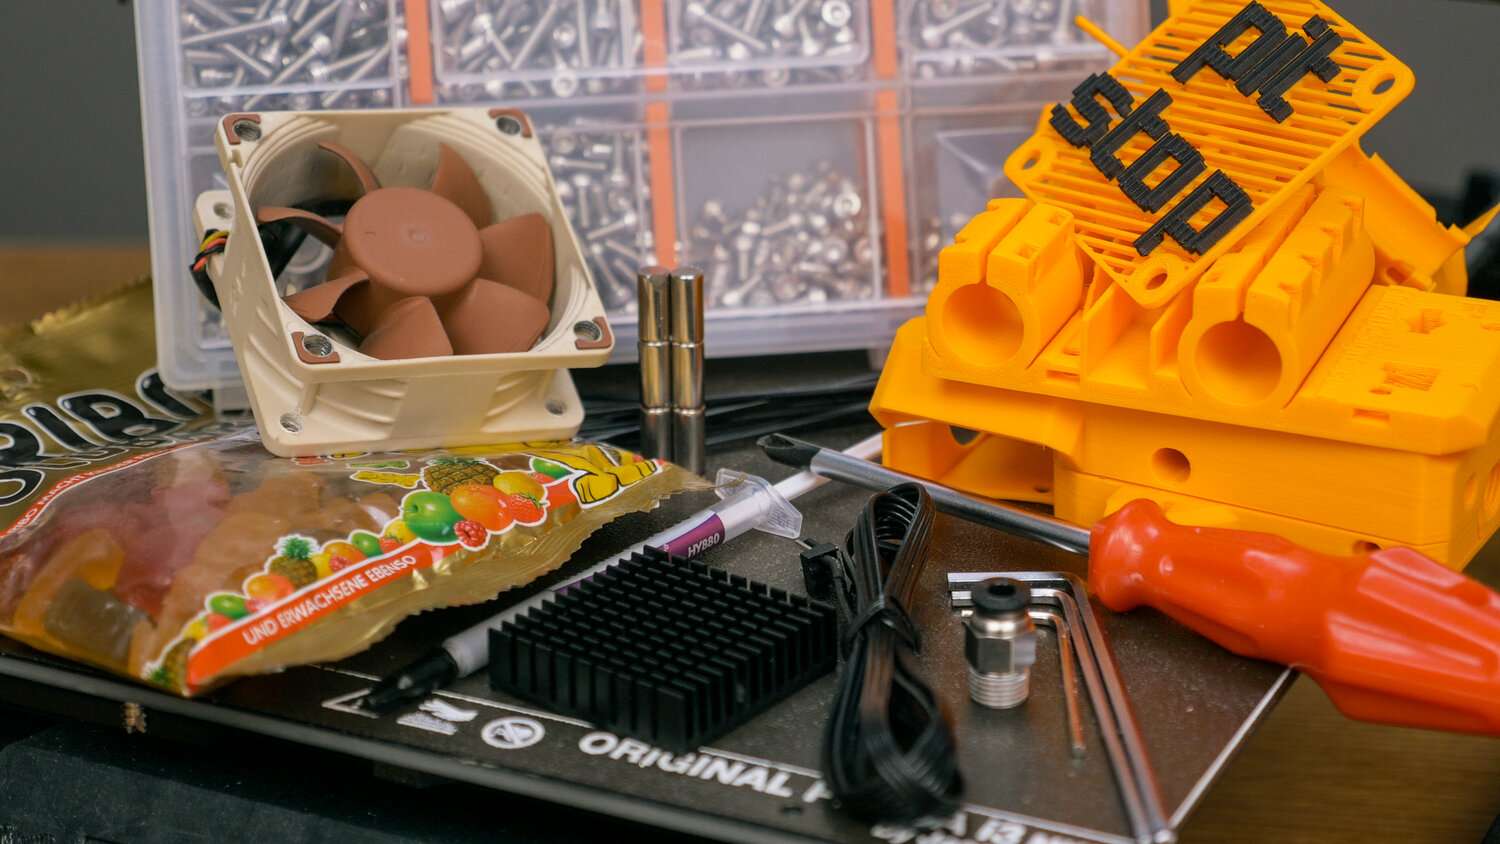
Printed parts
If owning only one printer, consider printing the parts twice in case some break (especially the fan duct).
- PitStop extruder printed parts on the STL page at the next step.
- Piece of filament same material as the extruder printed parts
- Adapted Revised X-Axis mod (optional) if you used to use the Revised X-Axis mod, or have the Prusa Bear upgrade with Bear X-Axis, or want to use IGUS bearings for the Z axis. Update: I don't recommend using dry run bearings anymore. The original Revised X-Axis won't fit! I don't know if this is compatible with the stock Prusa printer. This requires more parts, screws, and HEX nuts. STL page
- Universal Zaribo Einsy Box fan cover and fan grill (optional) if you're using the Universal Zaribo Einsy Box and want to reuse the 40mm fan for cooling the board. STL page
- Screw helper sheet (optional) if your screws don't come as a set, 2D printed on paper at original size, unscaled
Reused or spare extruder parts and tools
- All stock extruder hardware, except for: stock printed parts, nuts, and screws
- M2x8 IR sensor screw
- 2pcs M3x40 screws, one spare and one from the extruder, including the spring
- 2pcs M3 nylock nuts for the idler door and MMU2S lever
- 1.5mm Allen key and 2.5mm Allen key with ball end or get a hex screwdriver set (or hex bits). You can also get a long hex bit set similar to what I have in my videos, or ball head. You need a quick change bit holder (in case your drill doesn't come with one)
- 3mm Allen key if using the full Bear frame
- Philips screwdriver
Required hardware
- 6pcs 6x13mm cylinder Neodymium magnets they vary in grade from N35 weakest to N55 strongest. Doublecheck the thickness! I've got the HAB&GUT ones. You can also try Ebay. Especially for US, a very good enough alternative are shorter 6x10mm N50/N52 magnets. They're strong enough. Other alternative: get 12 6x6mm cylinder magnets
- MK3S IR sensor magnets which normally come with the MK3S printer or the MK3->MK3S upgrade, so you likely have them already. However, if you had the MK3 and purchased the MMU2S upgrade, this does NOT come with the magnets. You need a 10x6x2mm and a 20x6x2mm magnet (or slightly smaller). You can get 2 larger magnets and break one in half
- Noctua NF-A6x25 5V 3-pin fan. Has to be the 5V version for the stock board. If the stocks ran out, you can alternatively get the 4-pin version and skip the pwm wire (if you plan doing wire splicing). If you have a different board that provides 12V or 24V for fans, you need either the 12V fan and/or find ways to get the right voltage to the fan, otherwise it'll get fried
- 40x40x11mm heatsink. You can also get ones that have adhesive tape and skip the thermal paste below. Cleaner, but can be slightly more difficult to assemble/disassemble the motor area
- Thermal paste for the heatsink. Any will do as long as it transfers heat, like CPU paste, thermal grease, liquid copper paste etc
- 10pcs thin zip ties to connect the cables at the back, the thinnest you can find
- M3 screws stainless steel with the typical round hex head. You can get them as a set. You need: 6pcs M3x8, 15pcs M3x12, 3pcs M3x16, 4pcs M3x20, 3pcs M3x25. You'll also need to reuse 2pcs M3x40 screws. Make sure the screws you get have the correct head (round on the outside, for 2.5mm Allen key)
- 32pcs M3 thin square nuts - check a local supplier for better prices. Thick 2.4mm nuts won't fit
- 8pcs M5x10 fan screws - 4 come with the fan and are compatible, the other 4 are for the fan grill and you can use spares from Prusa Bear upgrade, or find a replacement. If using screws with a hex head, make sure you have the correspongind 3mm Allen key
- Your preferred grease for the rods. If using IGUS DryLin bearings, I recommend Lithium based grease (even though they self lubricate); they get damaged from some other greases. Avoid the 14Oz/400g cartridges because they tend to leak
- Pliers or other means of taking off print supports
- Bag of Haribos
To connect the new fan to the board you can either find a good extension cable or splice your own:
Choice: Extension cable option hardware
2 sub-options
- 3-pin 70cm+ extension cable for the fan, if you want to avoid soldering. Make sure it can fit on the board. I don't have any good links for this unfortunately. The board uses Molex SL connectors, and the fan uses Molex KK 254 connectors. Let me know if you find a cable that works.
- Or, find some way of improvizing a 70cm+ cable. For example get a similar cable that does not fit the board and connect it to the board with short male to female jumper wires. A bit harder to use because the jumper wires are easy to pull out by mistake. For US, you can try this Dell fan power adapter which could work (I have not tested it).
Choice: Splicing option hardware and tools
This option is hard to revert should you decide to move back to the stock extruder.
- Extension wires (optional) for the fan. Only needed if you want to get rid of the extra fan connector at the side of the extruder. Most electric wires will do. Aim for a wire thickness similar to the existing fan wires. You can get a 3 wire cable
- Heat shrinking tube or electrical tape (about 3mm thick if using tubes, and optionally a thicker one around 6mm to cover all 3 wires)
- Soldering kit (otpional) if you know how to solder. Alternative wire splicing possible
- Heat gun (optional) only if using heat shrinking tube. Also useful for removing strings in prints
- Wire stripper (optional)
- Multimeter (optional) only if you want to check wiring
Please note that soldering is not explained in the assembly guide. You are expected to know how to solder properly. Bad wiring can lead to fire or other problems. If in doubt, use the alternative wire splicing covered in the assembly guide.
Optional hardware
- PC4-M10 fitting in case you use a PTFE tube to feed the filament, or are using the MMU2S unit
- 2 jumper pins with wires or 2 pin wired connector only if reusing the 40mm fan to cool down the board
- 3pcs IGUS bearings or you can get more for the Z axis, or 10 for the whole printer. Update: I advise against using dry run bearings. Caution with these ones as they can improve print surface finish and Z banding, but are more sensitive to printer build errors and can lead to calibration failure or print artefacts (like the "602" issue). I only recommend them if you're having issues with the current bearings and this is not the first mechanical mod you've done
- IPA 90%+ for cleaning the motor and heatsink. Also useful for cleaning the printer bed (textured sheet). Some dilute it down to 90-95% for better cleaning performance. I don't recommend hand sanitizer products
- Glue to fix the IR sensor magnets in place in case they decide to jump around. Not glue stick!
- Paper towel or cloth for wiping rods.
- Other tools may come in handy, such as pliers and a power drill and metric drill bits of 4mm and 8mm.
- A spare V6 extruder block or just the radiator can be used to test fitting for printed parts when doing the initial checks.
Bare minimum parts and tools
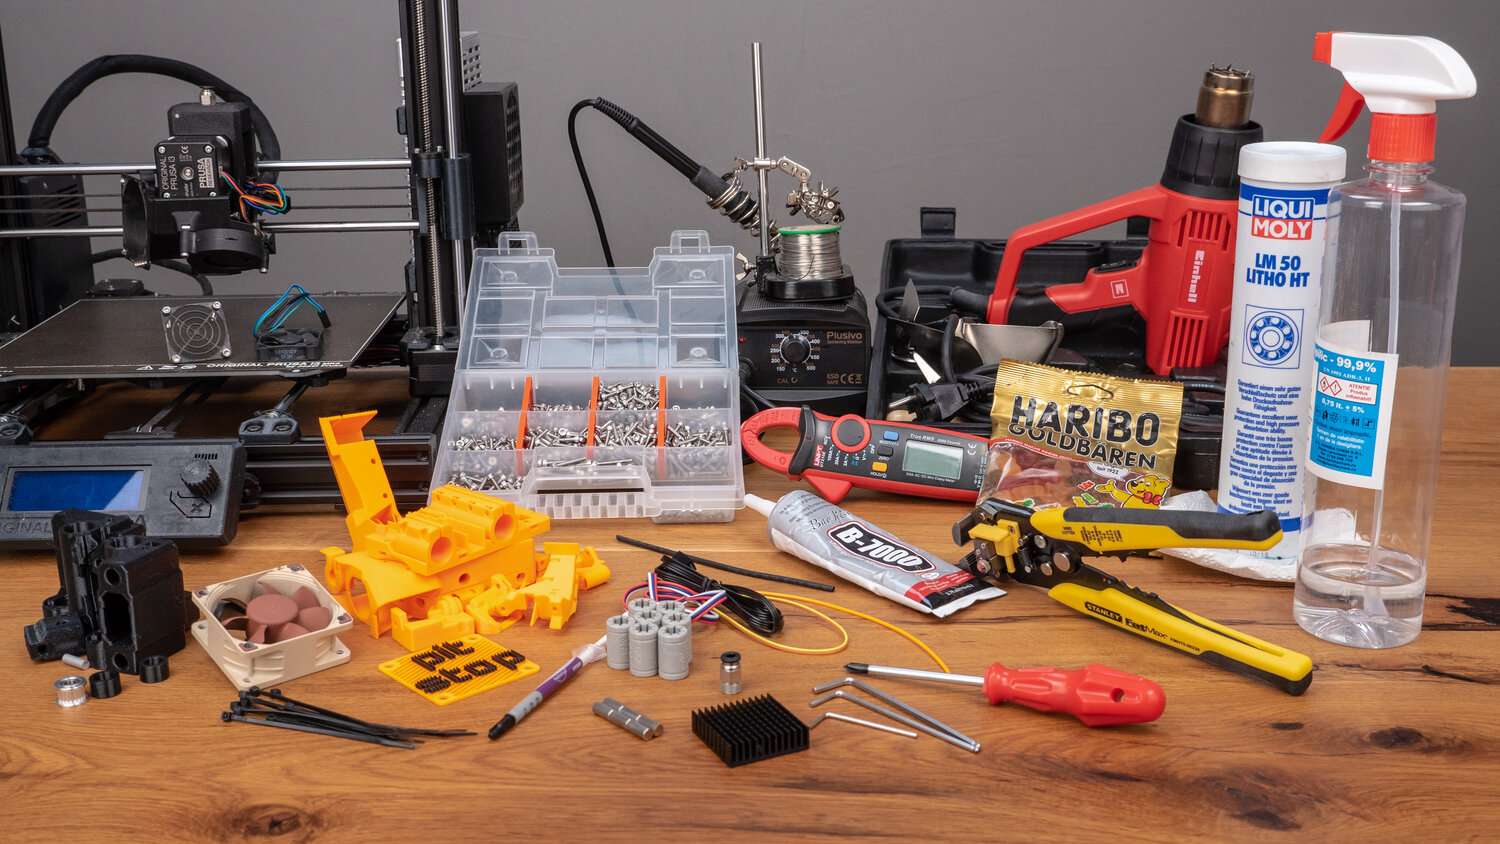
Most accessories and tools